When my husband and I were constructing the terraces on the east side of our house, I decided to put in a series of steps corresponding to each level of terrace. Most of the terraces needed only 3 steps but the bottom of this very steep hillside required at least 6 steps.
I wanted the steps to be in a rectangle with 90° corners; i.e. I wanted the steps to be square. But, how was I to get a rectangle and not a parallelogram (the line formed by the step ends skewed right or left)? I asked my husband and, being very mathematical, he explained how the Egyptians determined their square corners using only stakes and string. You can use this method where ever you desire square, 90° corners, not just for steps like I did.
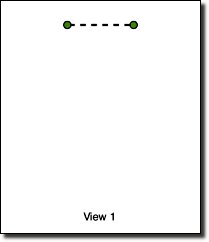
First, place two stakes representing one side of the corner you are creating. I will call these corner stakes. In my case, I put two corner stakes in the hillside at the angle that I desired for my top step, four feet apart because that was the length of my railroad ties. In View 1, the green circles represent the corner stakes.
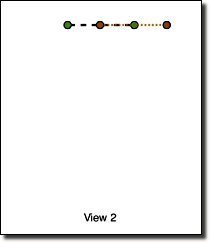
Then, place two stakes equidistance to either side of one of the corner stakes, in line with the both corner stakes. I will call these scribing stakes. I placed my two scribing stakes about 3 feet to either side of my right corner stake. In View 2, the orange circles represent the scribing stakes.
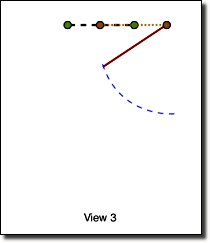
Next, attach a string to one of the scribing stakes and tie a small stake or large nail on the end of the string so you can mark the ground. After attaching the string, the string should be longer than the distance from the scribing stake and the middle corner stake. Holding the string taunt, scribe an arch where you want the side line to be. i.e. use the stake or nail on the end of string to make a circular line on the ground.
When I was building my steps, I used a string of about 6 feet and a small, sharp wooden stake. In View 3, the reddish line represents the string and the blue dotted line represents the scribed arc.
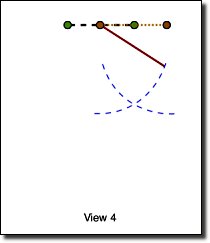
Using the same sting and stake or nail, the same final length of the string, and the same tension on the string, mark an arc from the other scribing stake on the ground, being sure to cross the first arc. In View 4, the string is represented by the reddish line and the arc represented by the blue dotted line.
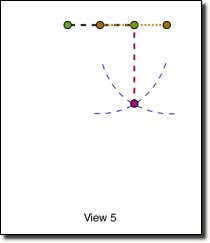
Where the two arcs cross is 90° from the original line. Put a stake in the ground at the intersection of the two arcs. I will call this the side stake. In View 5, the purple circle represents the side stake; the purple dotted line is a right angle from the line formed by the two corner stakes.
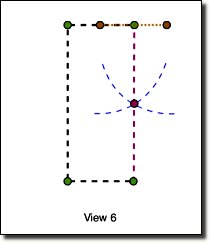
If you're just trying to get a right angle, you're done. In my case, I wanted a rectangle in which to put my steps as shown in View 6. You can complete a rectangle two ways:
1. Using the rectangle side measurements:
Extend the 90° side line to the length you desire and place another corner stake there.
Attach a string to the other corner stake that you did not use to place scribing stakes and tie a small stake or nail to the other end. The final length of this string, after attaching, should be the length of the first side line. Scribe an arc in the ground.
Attach a string to the new corner stake you placed in step a and tie a small stake or nail to the other end. The final length of this string, after attaching, should be the distance between the first two corner stakes. Scribe an arc in the ground.
Place a corner stake where these two arcs cross. You now have a rectangle delineated by four corner stakes.
2. Determining another right angle:
Extend the 90° side line to the length you desire and place another corner stake there.
Place two scribing stakes equidistance from the corner stake for the second side, again inline with the two initial corner stakes. Follow the directions for scribing the two arcs and place a second side stake.
Extend the new 90° side line to the same length as the other side and place another corner stake there.
These two new corner stakes should be the same distance apart as the original two corner stakes. You now have a rectangle delineated by four corner stakes.
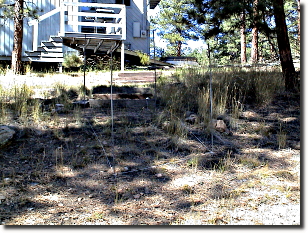
The first image shows the four corner stakes and string tying them together that delineate the rectangle that I used for my steps. I used tall stakes because 1) that's what I had available then and 2) I knew I was going to dig deep into the hillside for the depth of the steps and I wanted to be able to pound in the corner stakes so one would not fall over and lose the correct place for a corner.
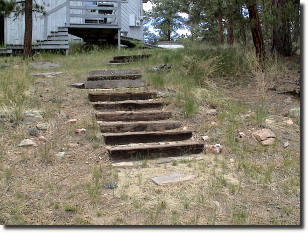
The completed steps are shown in the second image. This image was taken at almost the same angle and distance from the first image. As you can see, the steps fit into the stake/string rectangle with the sides of the steps making a straight, 90° line from the top step.